

- 30 Day Refund Policy
- The Ultimate Privacy and Security with Low-Cost SSL Certificates, PremiumDNS, VPN, and A Range of Features Included with Each Account
- One of The Most Knowledgeable, Friendly, and Professional Support Teams Available 24/7


- 30 Day Refund Policy
- Free domain, Free site transfers, Free SSL certificate
- Support available 24/7/365 via Phone, Chat, Tweet, Knowledge Base
Namecheap vs HostGator: Quick Summary
After trying both, HostGator came out on top for me. Namecheap impressed me with its low prices and solid speed, but HostGator just felt more complete.
The setup was smoother, the dashboard easier to navigate, and their live chat support actually solved my issue in minutes.
Namecheap is great if you just want cheap, reliable hosting, but I found HostGator a better long-term pick. It’s more user-friendly, offers stronger tools out of the box, and just feels easier to manage day to day.
1. Prices and Plans Comparison
Namecheap’s rock-bottom prices are hard for HostGator to match.
If you’re price-conscious like I am, Namecheap is the clear winner. Their shared hosting starts at just $1.98/month, and even their top-tier plan costs less than HostGator’s mid-range option.
I found their WordPress hosting through EasyWP even more affordable, especially with the huge first-year discounts.
HostGator’s shared plans aren’t bad. You get decent features and support, but those low promo prices don’t last. Once it’s time to renew, the costs jump quite a bit.
The same goes for their VPS and dedicated options. Namecheap stays budget-friendly across the board, while HostGator leans into higher specs with a higher price tag to match.
If you’re just starting out or running on a tight budget, Namecheap gives you more value upfront.
2. Customer Support Comparison: Who’s Got Your Back?
HostGator provides faster, more accessible human support.
Namecheap Customer Support
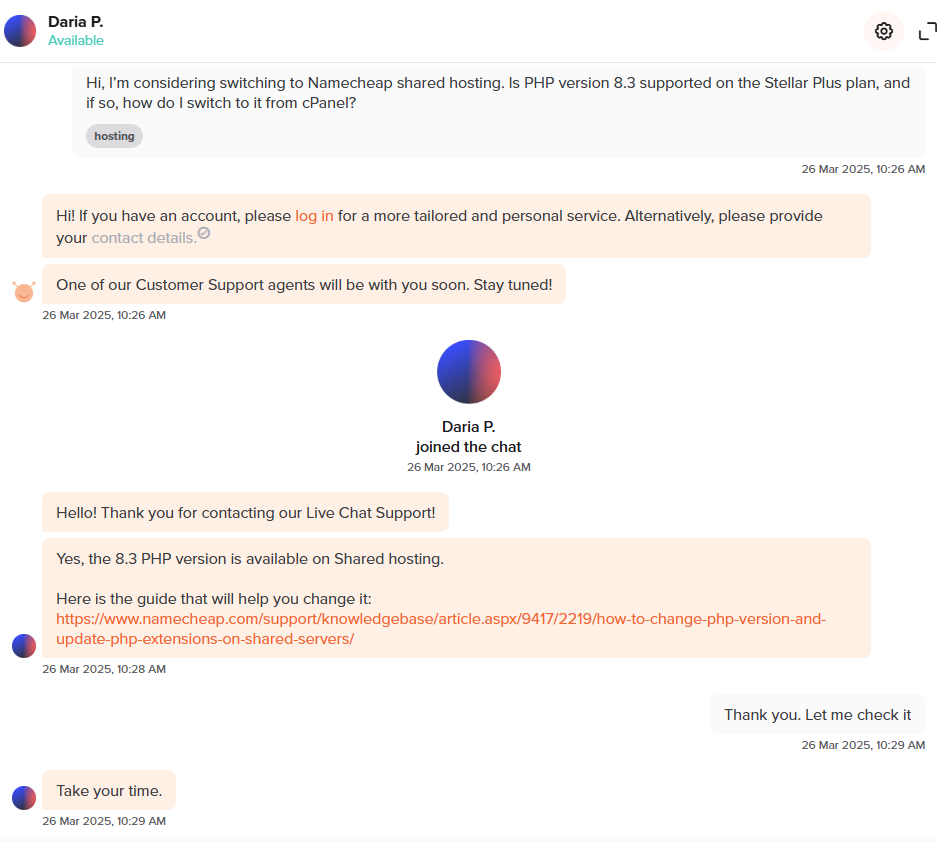
I tested Namecheap’s 24/7 live chat, and it mostly delivered, though there were a few small hiccups.
After joining the queue and picking “Sales/Pre-Sales,” I got connected within a few minutes. The agent was polite and responsive, but the answers felt a bit scripted at first.
I had to dig a little to get specifics on hosting Laravel apps and SSH access. Once I pressed for details, though, they gave clear info, like how Laravel works best on VPS or dedicated plans, where you get full control.
Namecheap also has a strong knowledge base. When I searched for backup policies and database access, the articles were well-organized and up to date.
I also liked that I could find video tutorials for basic tasks like WordPress installation or DNS configuration.
One thing that stood out: there’s no phone support. If you prefer talking to someone directly, that could be a drawback.
Live chat and tickets are the only options, and while they usually work well, they’re not always instant, especially during busy times.
HostGator Customer Support
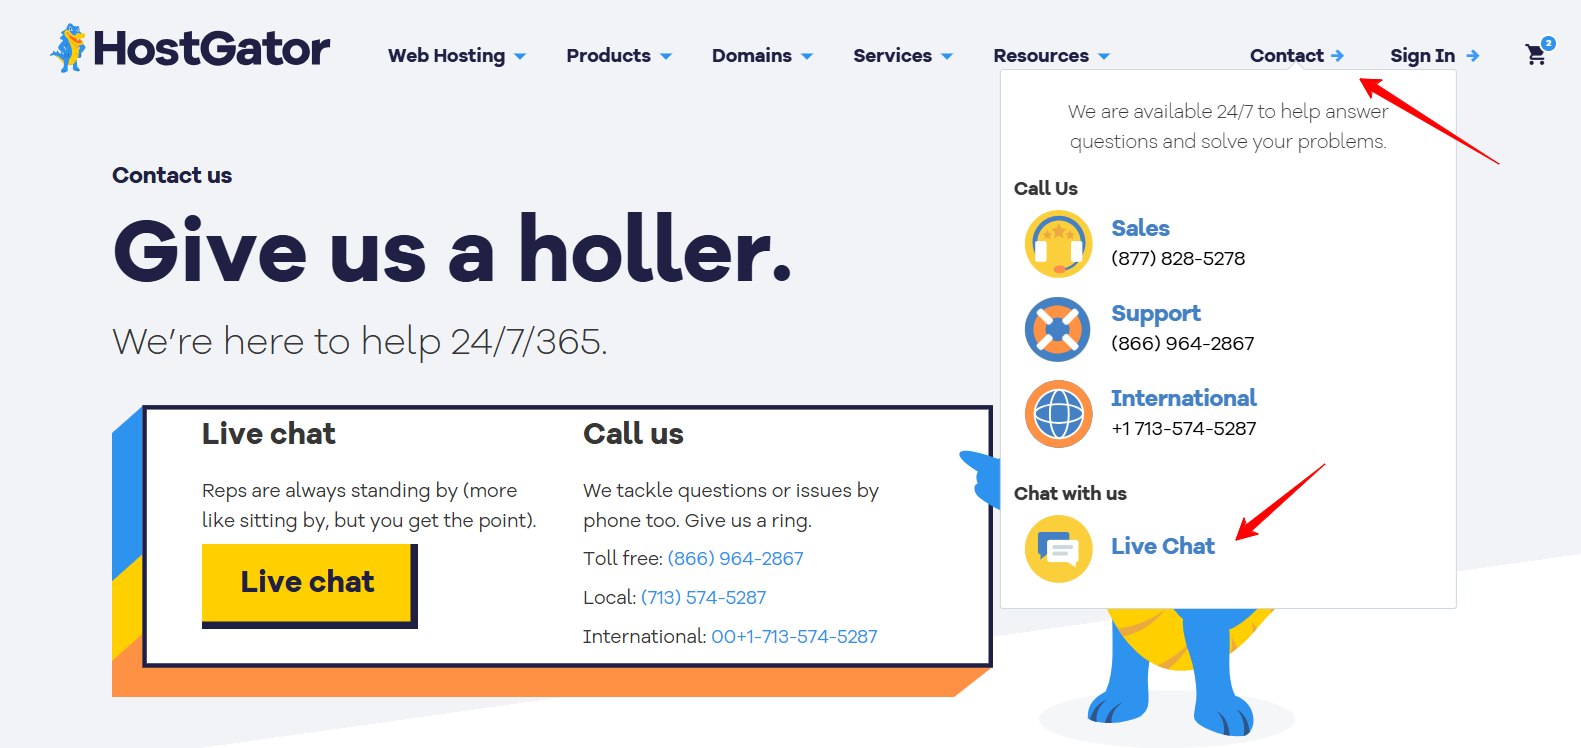
HostGator’s support, on the other hand, was faster and more proactive, especially for someone not yet signed up. I went to their homepage, hovered over “Contact”, and launched their Live Chat.
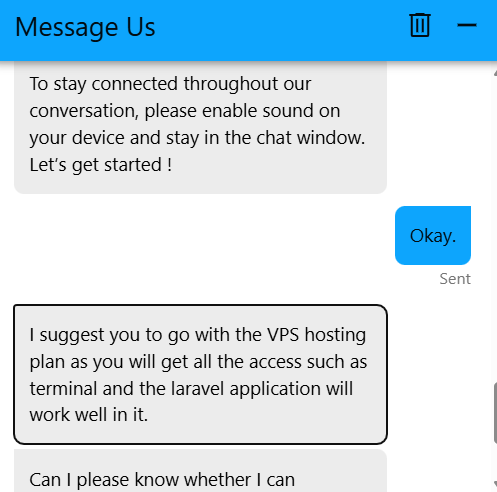
A bot greeted me with a few quick questions, and after choosing “Purchase New Services,” I got connected to a human agent in under 30 seconds, which was impressive.
I asked if I could host a Laravel app using Redis or Supervisor and whether I’d get terminal access. The agent immediately recommended VPS hosting, confirmed it supports background processes, and explained I’d have full access to configure things myself.
The whole exchange was smooth, polite, and refreshingly efficient. I didn’t have to go in circles for an answer. They gave me a direct recommendation, which I appreciated.
Aside from live chat, HostGator also offers phone support, email, and a forum, which adds more flexibility depending on your preferred support style.
They also have a rich YouTube channel, a detailed knowledge base, and even webinars. These are great resources if you like to learn by watching.
3. Hosting Features Comparison
HostGator offers more built-in features on its base plans, including backups and better security tools.
Namecheap Features
I signed up for Namecheap’s Stellar shared plan and liked how easy everything felt, thanks to cPanel. Managing domains, WordPress, and email was straightforward.
I could host up to 3 sites, and their free Site Maker tool, with AI text and images, made building a clean, responsive site super quick and budget-friendly.
One downside: daily backups aren’t included unless you upgrade to Stellar Plus. Still, you get free SSL, unmetered bandwidth, and Supersonic CDN, which helped keep my site fast and secure.
HostGator Features
HostGator impressed me with automated daily backups—even on the Hatchling plan. Plans scale smoothly: 1 site, then 20, then 50.
All include SSD storage, free SSL, unmetered bandwidth, and Cloudflare CDN. Even basic plans offer malware scanning, a web app firewall, and SSH, features that Namecheap lacks by default.
The control panel is beginner-friendly but still offers advanced tools like MySQL, raw logs, and cron jobs. Migration costs extra, but the feature set makes it worth it for serious projects.
4. Website Performance Comparison
Namecheap loads faster and responds more efficiently.
To really understand how well each host performs, I ran GTmetrix speed tests on live websites hosted on Namecheap and HostGator.
Namecheap Performance Results
Right out of the gate, Namecheap impressed me with its performance. The site I tested scored a GTmetrix grade of 93% for performance and 90% for structure, which shows it’s well-optimized and fast.
- Largest Contentful Paint (LCP) came in at 1.3 seconds, well within Google’s recommendation of under 2.5 seconds.
- Time to Interactive (TTI) was 1.4 seconds, which means users can start engaging with the site almost immediately.
- Total Blocking Time (TBT) was 0ms, which shows that scripts and page elements didn’t stall the user experience.
- Fully Loaded Time was 4.3 seconds, which is very acceptable for most use cases.
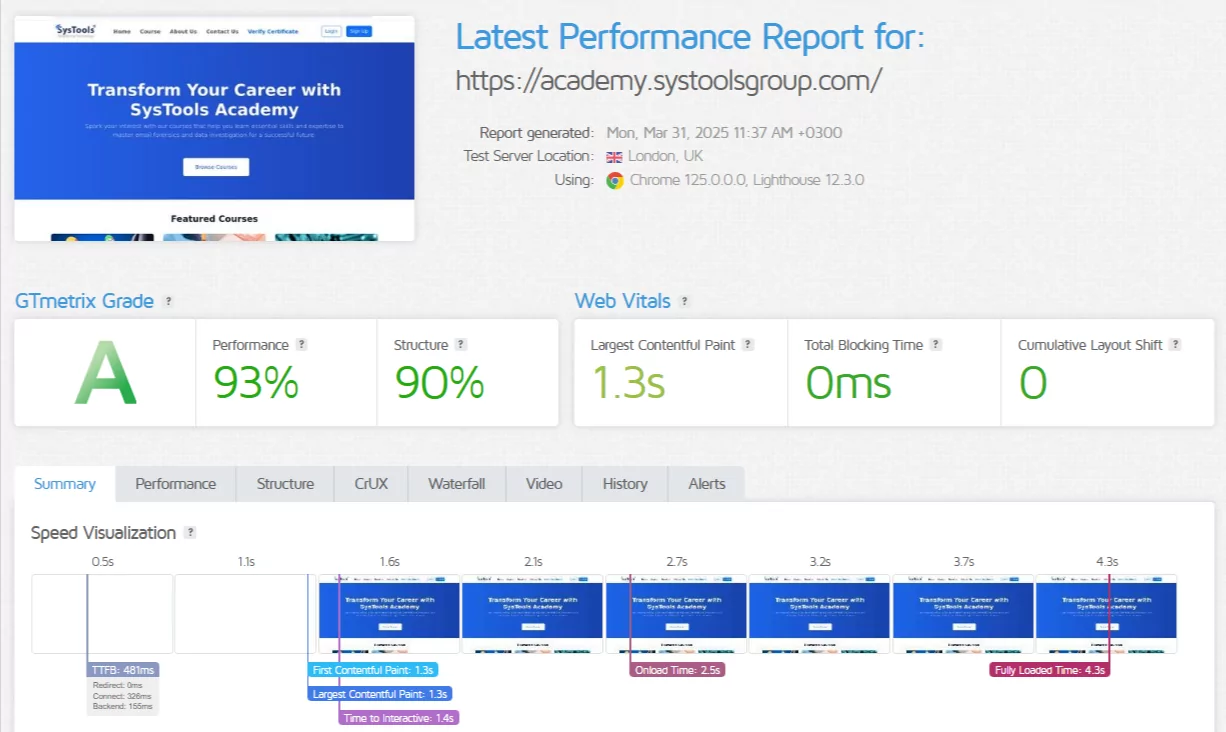
What stood out to me was how stable and fluid the page felt during loading. The waterfall chart showed no long pauses or heavy scripts slowing things down.
HostGator Performance Results
HostGator’s test results, on the other hand, were mixed. The performance score was just 57%, even though the structure scored a solid 93%, indicating the page was technically well-structured but underperformed.
- LCP was surprisingly good at 1.1 seconds, but this only reflects how fast the main content appeared, not the full picture.
- Time to Interactive took a major hit at 8.3 seconds, meaning users could see the page but had to wait a long time before interacting with it.
- Total Blocking Time was 2.1 seconds, suggesting a lot of scripts were competing for attention.
- Fully Loaded Time was a whopping 17.4 seconds, which is uncomfortably slow for today’s standards.
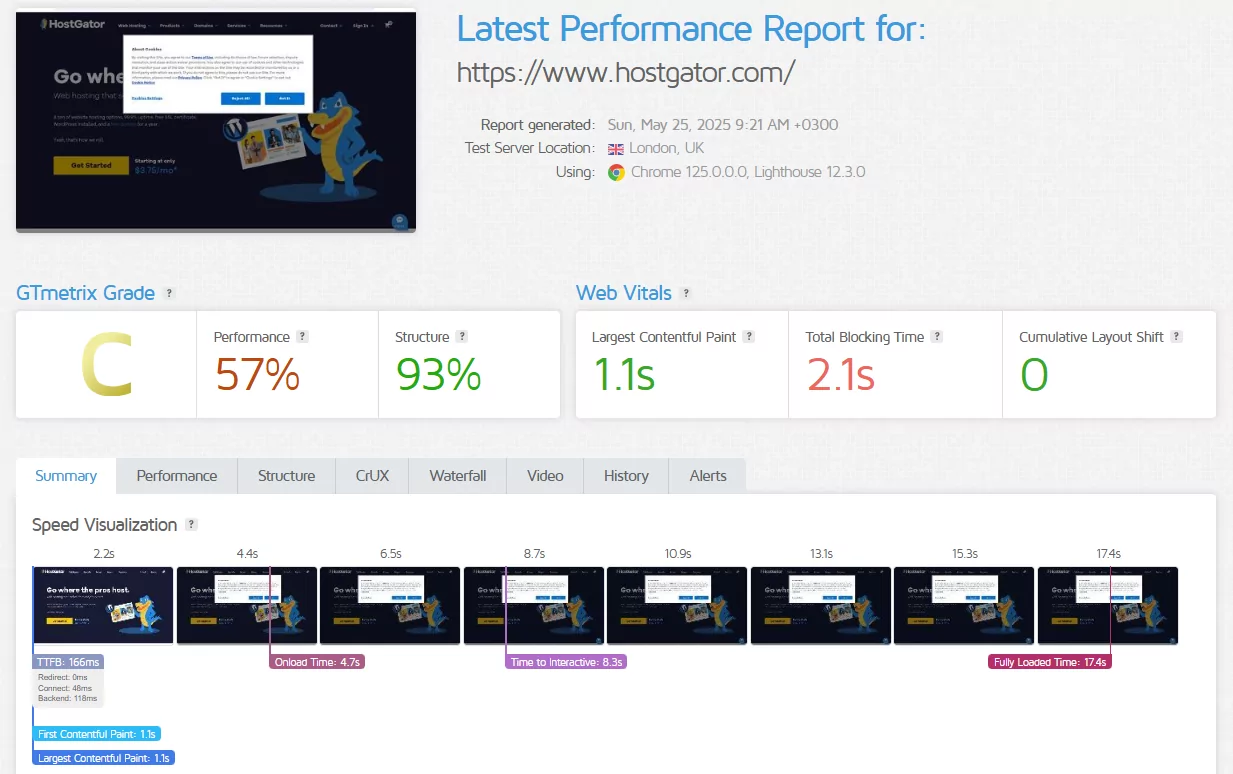
Even though TTFB (166ms) and backend time (118ms) were lower than Namecheap’s, the page slowed down significantly due to heavier scripts and a less optimized front-end.
Even though HostGator had a fast LCP and backend time, the total experience was sluggish due to script delays and bloated front-end resources. That’s why the Total Blocking Time and Time to Interactive were so high.
5. Ease of Use Comparison: Which Platform Is Easier to Use?
HostGator wins for its smoother WordPress setup, intuitive dashboard, and simplified server management tools.
When reviewing hosting platforms, the first thing I look at is how beginner-friendly they are. If I’m recommending one to someone launching their first site, it has to be smooth.
Smooth not just at sign-up, but also for everyday tasks like installing WordPress, managing backups, reaching support, and handling email or domains.
Namecheap Sign Up Ease
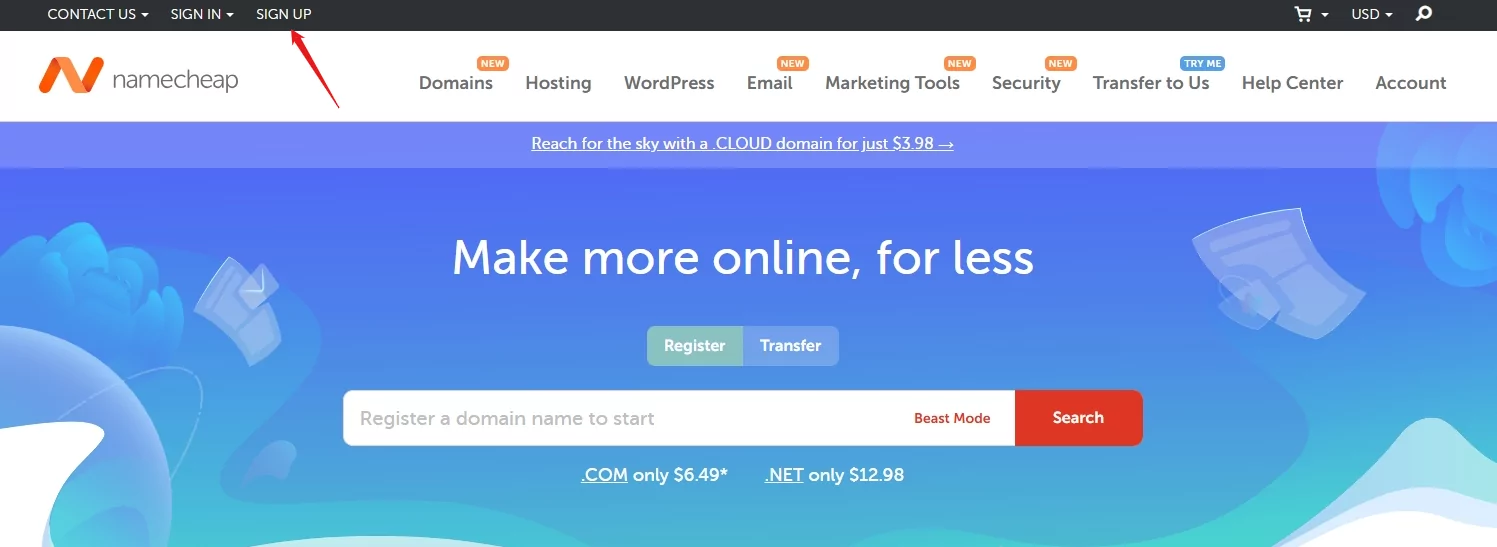
From the homepage, I clicked the “SIGN UP” button in the top-left corner.
That led to a form asking for basics: username, password, name, and email. Everything was clearly labeled with helpful hints..
One thing that stood out:
- Namecheap emphasizes that you can’t change your username later. So, I had to make sure I picked something I’d stick with.
- They also warn against using email addresses tied to domains you don’t yet own, which is actually a smart precaution in case that domain expires and you lose email access.
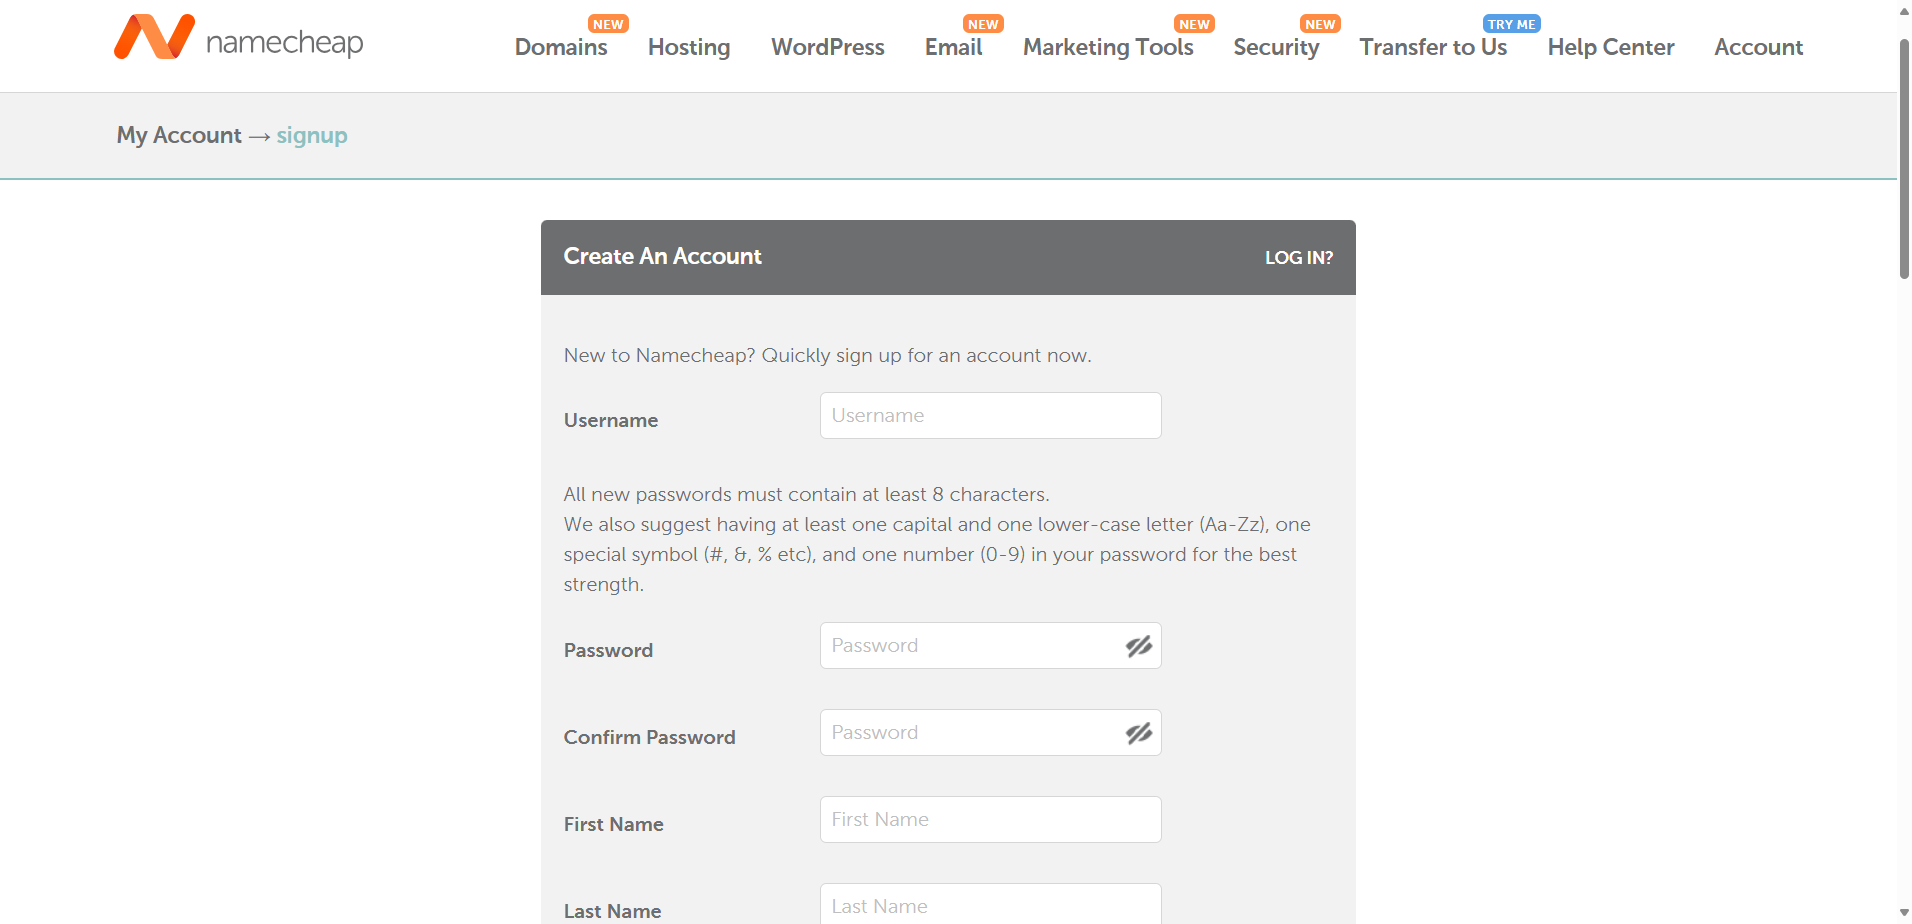
After filling out the form, I clicked “Create Account and Continue,” and just like that, I was in my dashboard, without email confirmation or waiting. The process was quick and seamless.
HostGator Sign Up Ease
Next, I moved over to HostGator to test their sign-up flow.
From the homepage, I hovered over the “Hosting” tab and clicked on “Web Hosting.”
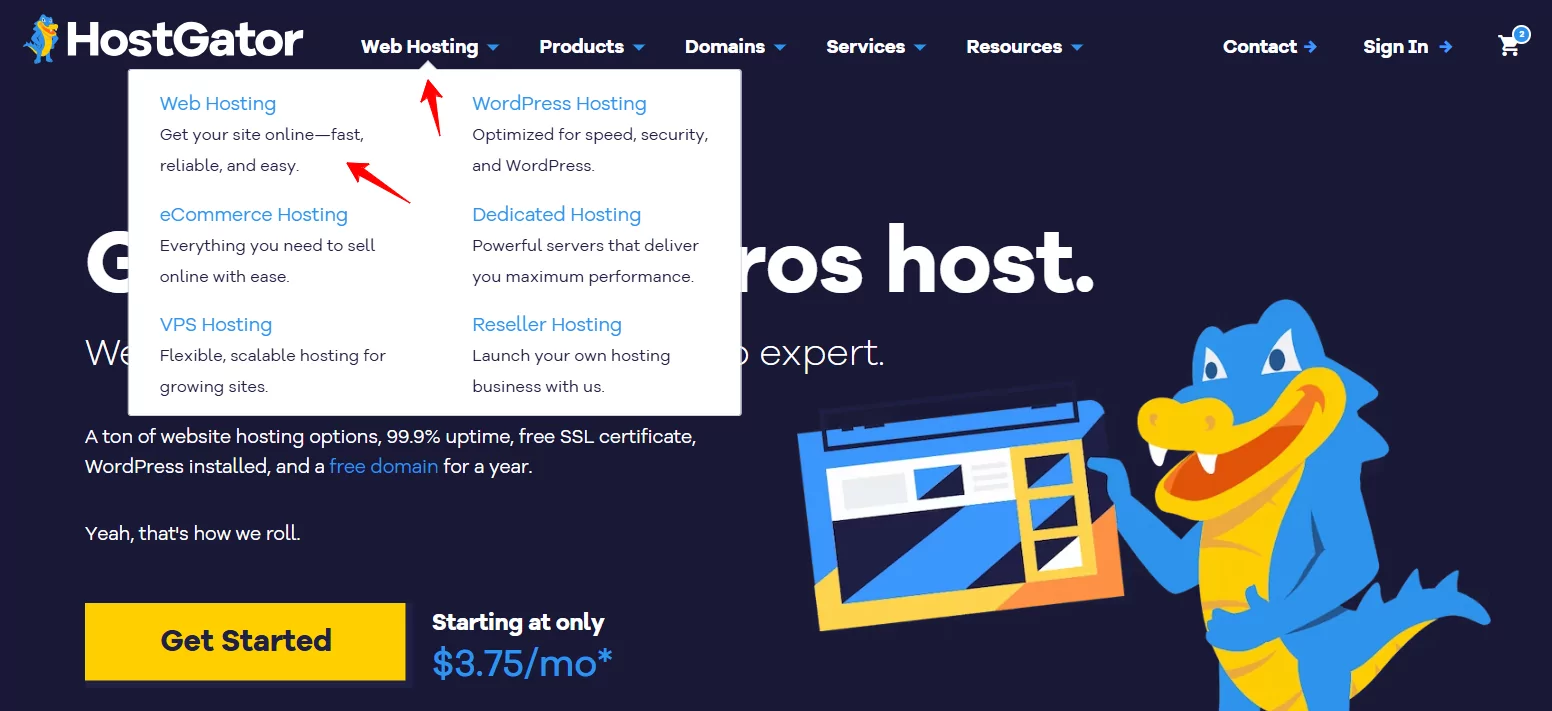
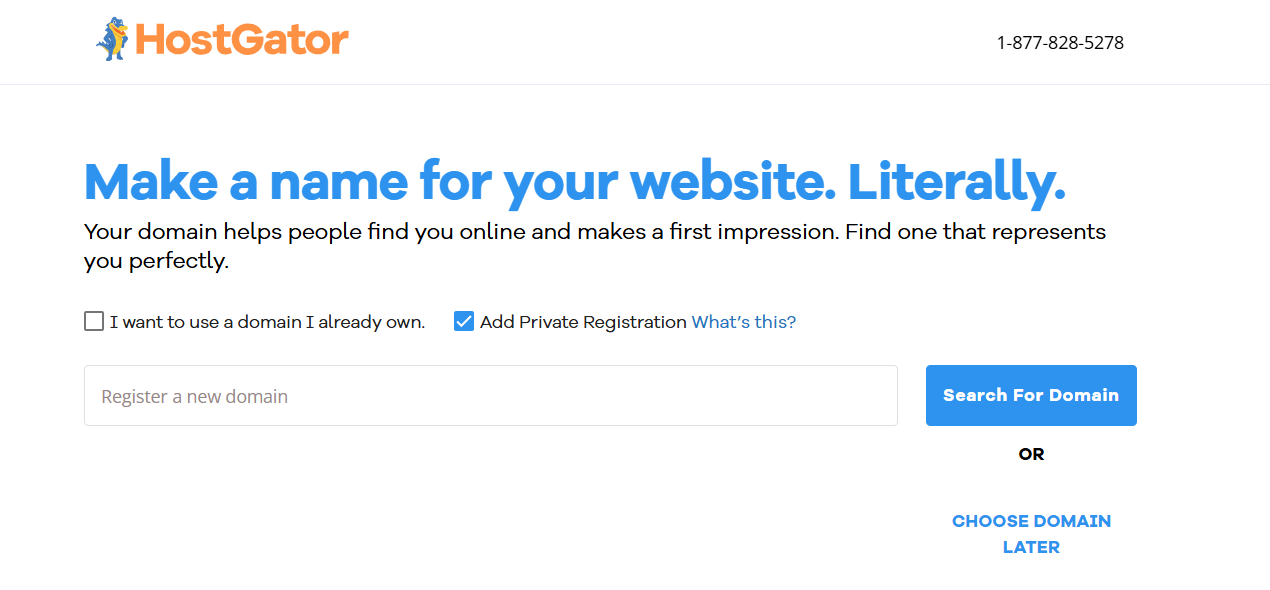
I browsed through the plans and decided on the Baby Plan. I hit “Choose Plan” and landed on a screen asking me to set up a domain.
At this point, I had three options:
- Register a new domain
- Use an existing one
- “Choose a domain later” (which is what I picked)
That took me to the Checkout page, where I chose a billing term. I went with the 3-year plan at $4.50/month and noticed some optional upsells right below, including:
- SiteLock security ($2.99/month)
- CodeGuard backups ($1.99/month)
- A trial of their Professional Email product
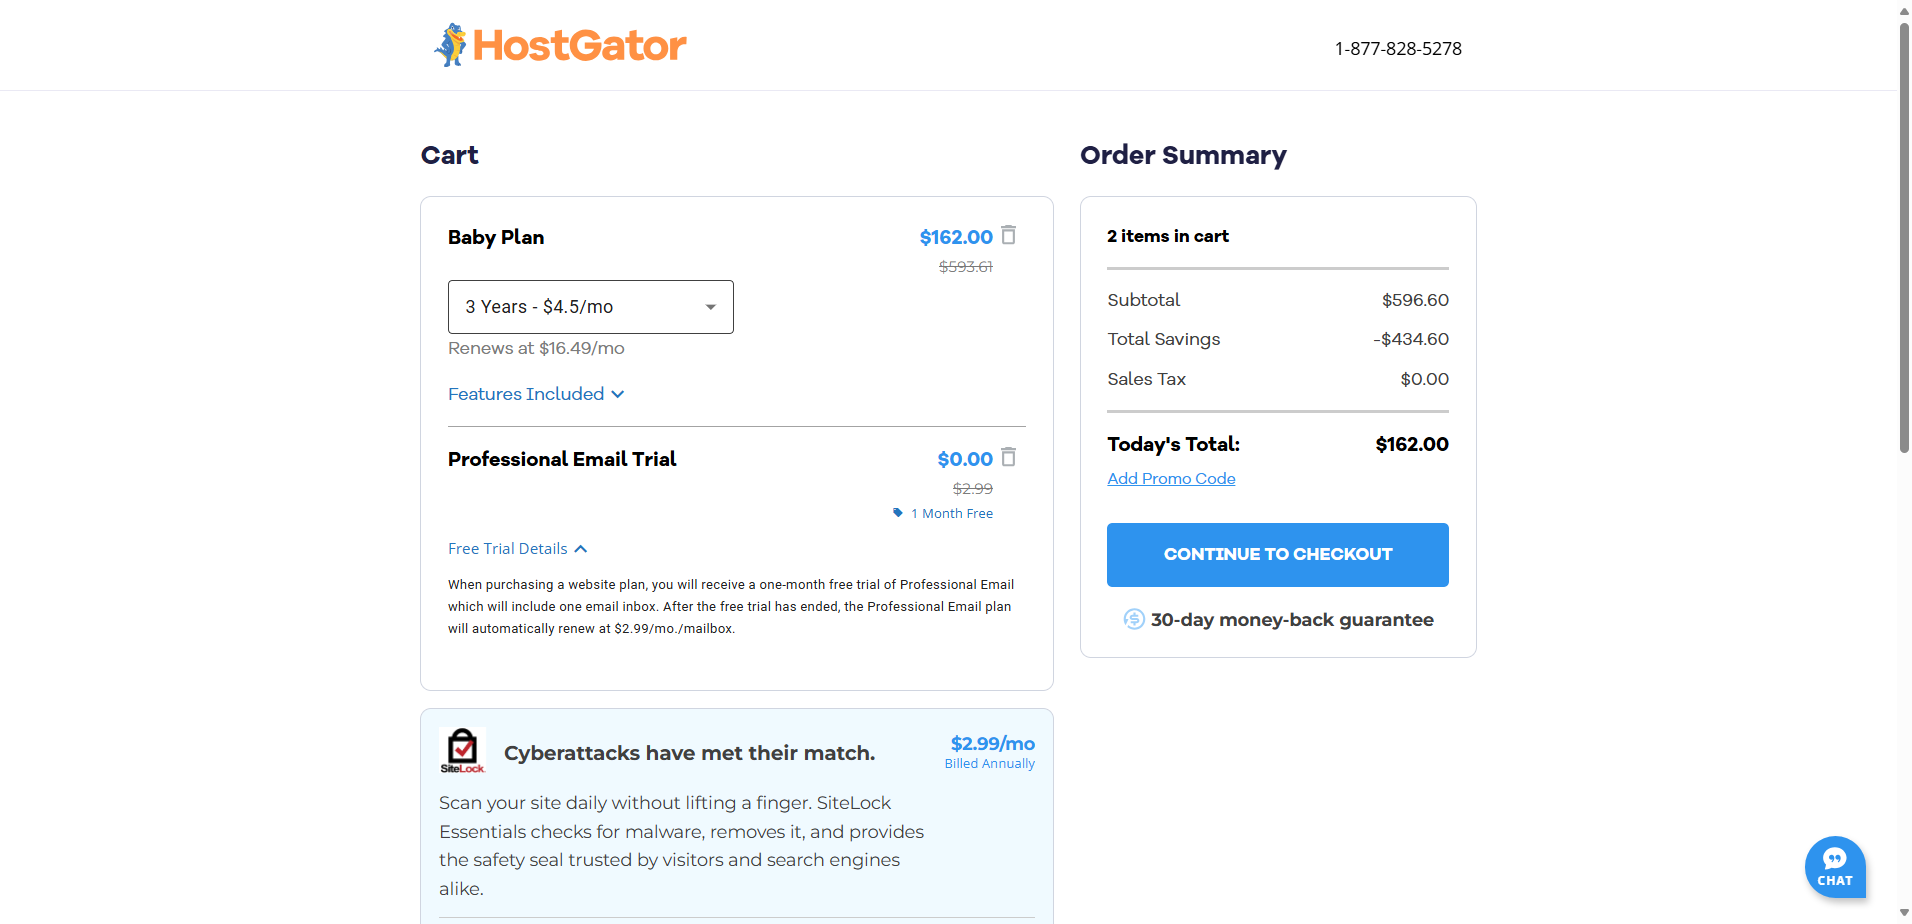
Everything was clearly marked, but I had to untick the extras manually. If you’re not careful, you could end up paying for services you don’t need.
After reviewing the price, I clicked “Continue to Checkout.” Then I moved on to the final step, where I filled in:
- Billing information (name, address, email)
- Account password
- Payment info (credit/debit or PayPal)
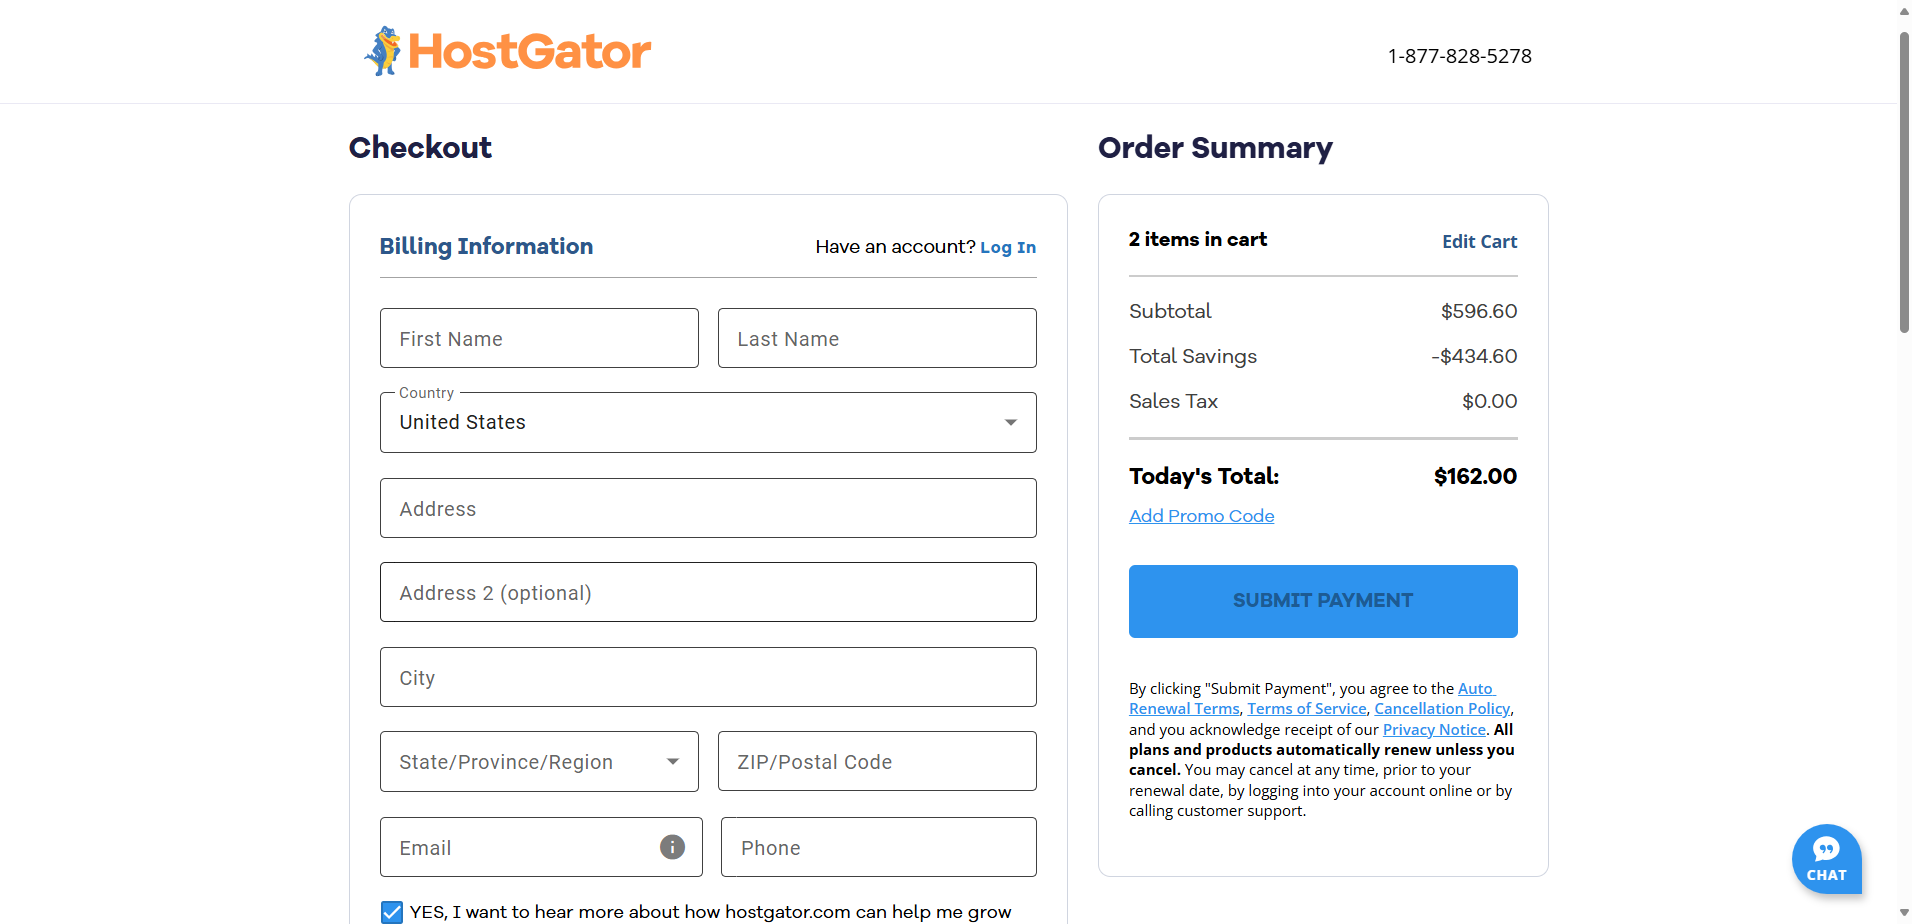
On the right, the Order Summary showed my subtotal, discounts, and total due.
After double-checking everything, I clicked “Submit Payment.” Overall, the process felt really well-designed, clear, and intuitive, with no moments of confusion or overwhelm despite the upsells.
Client Area and Dashboard
After completing the signup, I wanted to see how intuitive the dashboard would be, since that’s where most users spend their time.
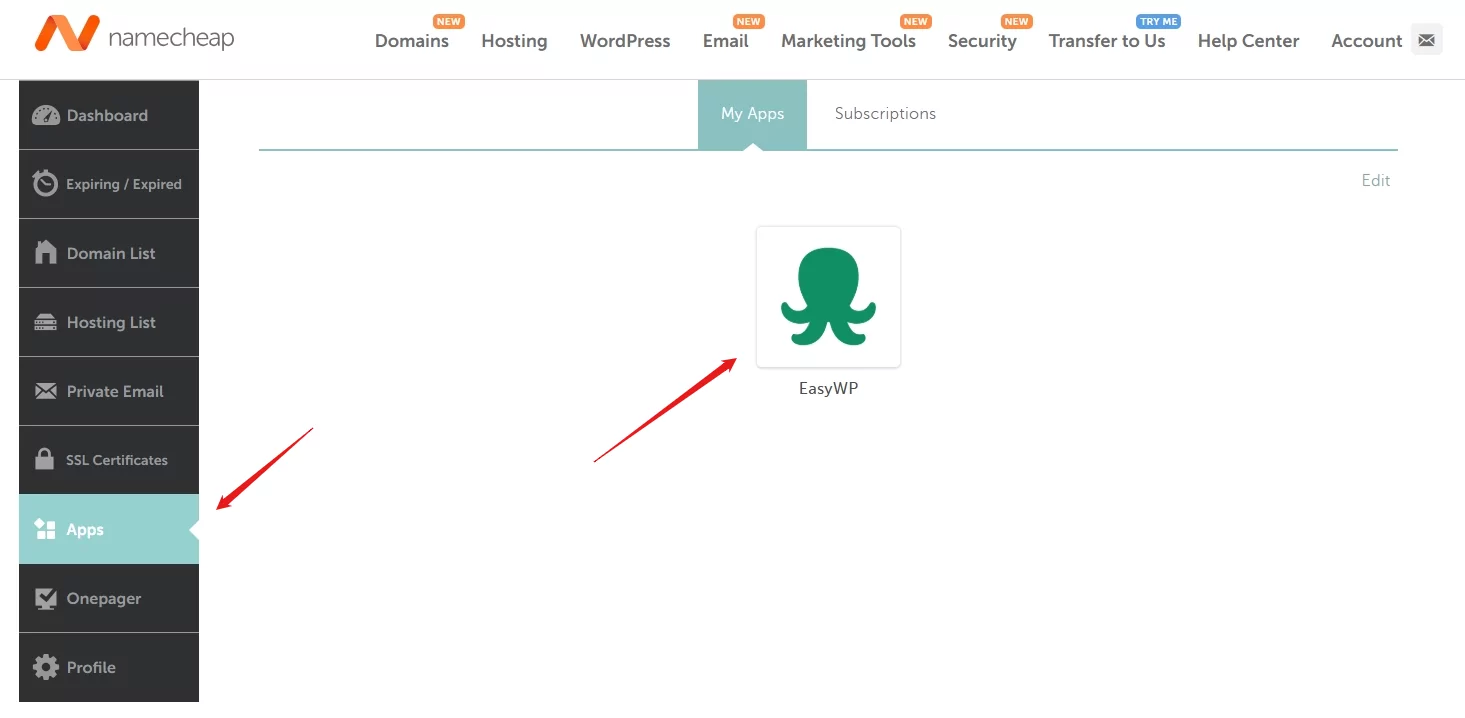
I started with Namecheap. From my account dashboard, I navigated to the Apps menu and selected EasyWP to manage my WordPress site.
Once inside, a modern, clean interface greeted me. Everything was categorized neatly:
- The Overview tab showed my domain, SSL status, and site uptime.
- Clicking “Manage” let me view my subscription, change the domain, manage SSL, and toggle maintenance mode.
- The Backups tab allowed manual backups (daily ones only on higher plans).
- File & Database gave SFTP and phpMyAdmin access.
- A simple analytics panel displayed RAM and CPU use.
- Other tabs like Security, Add-ons, and Notifications helped manage tools like HackGuardian and CDN integrations.
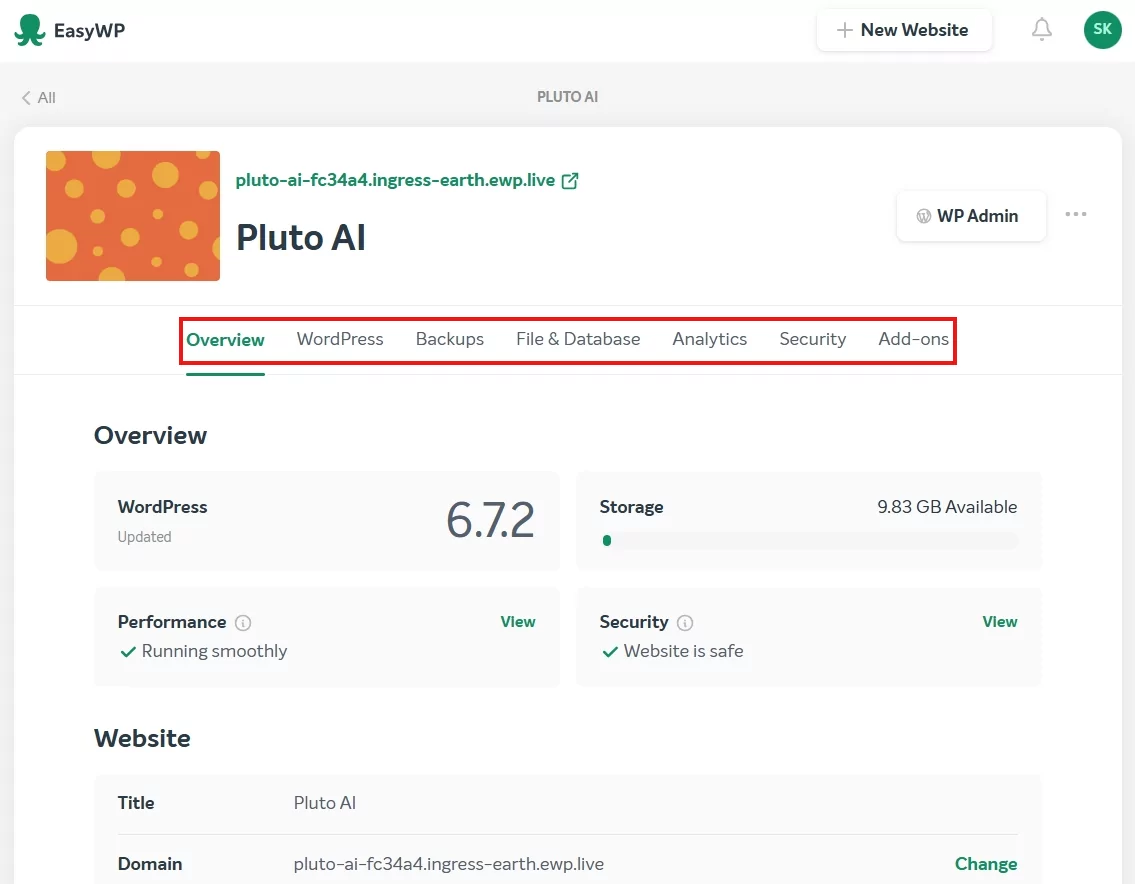
After a few minutes exploring, everything made sense, though it took some clicking to fully grasp each section. I’d rate the ease as Medium.
Next, I moved to the HostGator dashboard.
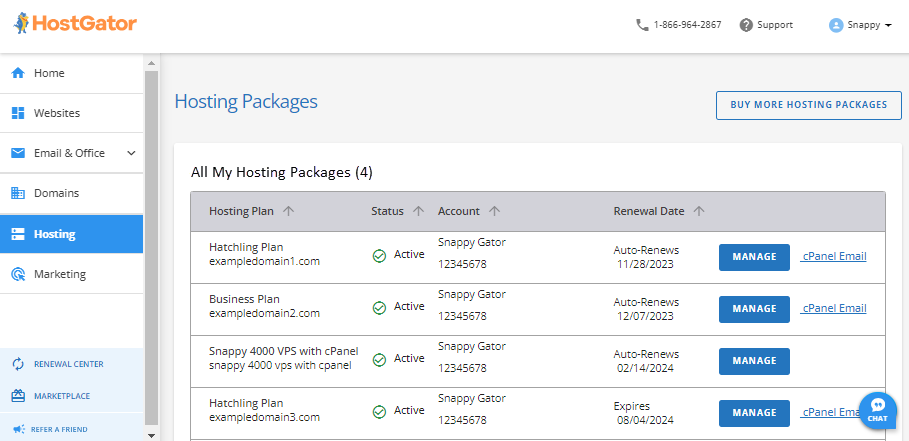
Right after payment, HostGator took me to their Customer Portal. On the left, I clicked “Hosting” and saw all my plans. Even with just one, it gave a clear snapshot:
- The plan name
- Domain
- Renewal date
- Status
- Two action buttons: “Manage” and “cPanel Email”
When I clicked “Manage,” I entered the Package Dashboard, and this is where HostGator really impressed me.
It gave me everything I needed at a glance:
- Server info (IP, nameservers)
- Quick buttons to add a new site, access cPanel, or launch WordPress
- Resource usage details (disk, CPU, bandwidth)
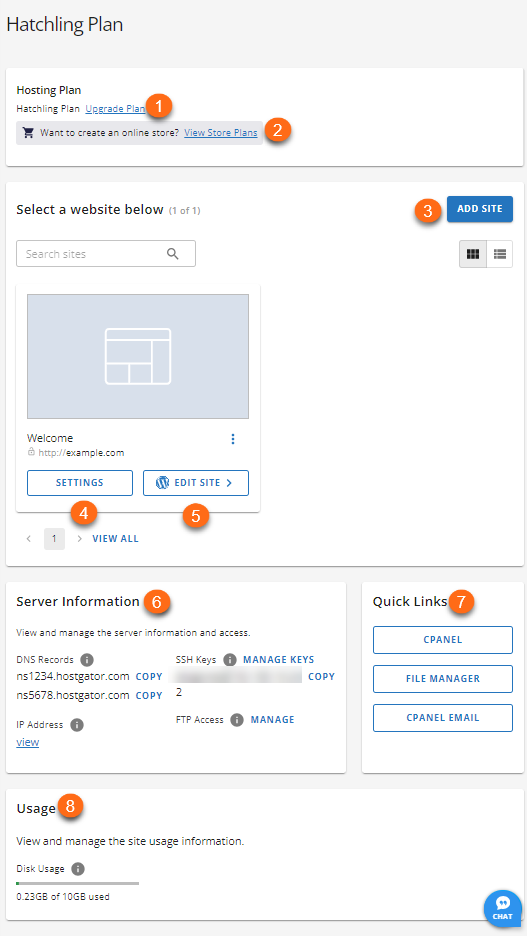
Everything was clearly labeled. Even if you’re a total beginner, the interface guides you, and you don’t need a tutorial. Compared to Namecheap, I felt like I needed fewer clicks to get things done.
Creating a New WordPress Website
This is one of the first tasks people want to do after getting hosting, so I wanted to see how fast and beginner-friendly the process really was.
Starting with Namecheap, I had two options:
- Use cPanel and Softaculous
- Or use the EasyWP dashboard
I tested both. With cPanel, I:
- logged in through “Go to cPanel”;
- opened Softaculous Apps Installer;
- clicked WordPress → Install;
- filled out the form with my domain, admin username/password, and site name;
- clicked Install.
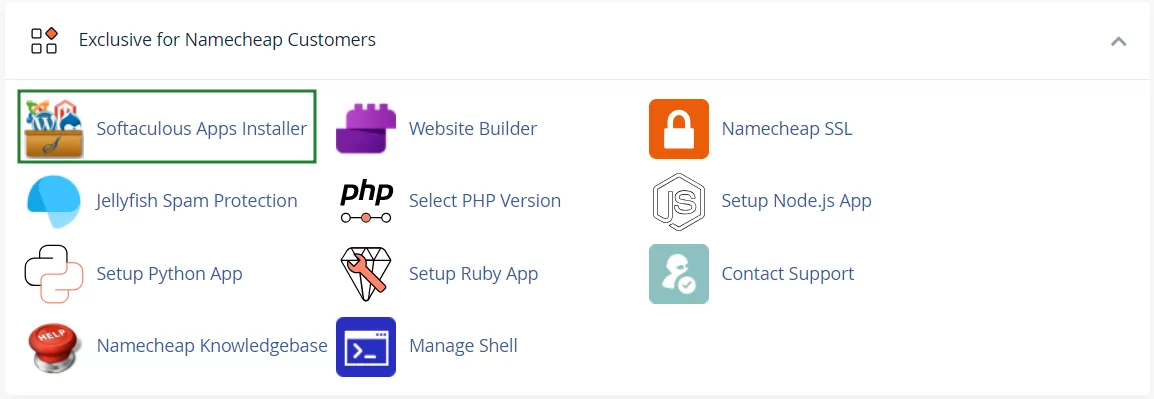
It worked fine, but it required more steps and felt more technical.
Then I tried the EasyWP method. This was much simpler:
- I clicked “New Website” inside the EasyWP dashboard.
- I named my website.
- I entered my domain.
- I clicked “Create Website”.
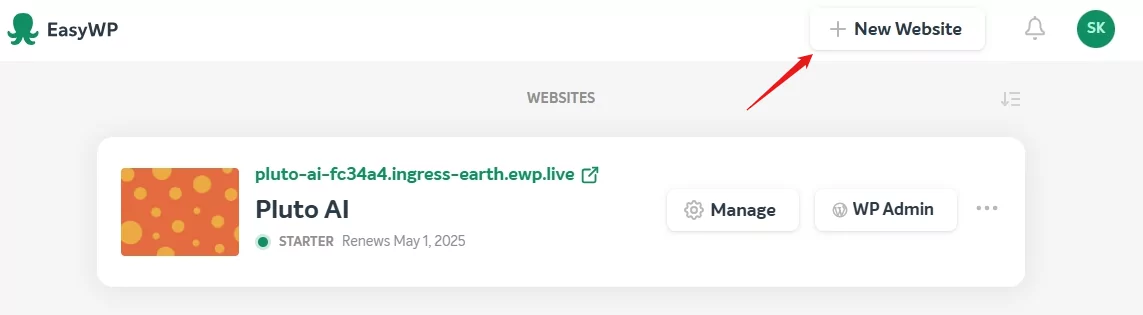
Done. WordPress was installed in under 2 minutes. This route is definitely best for beginners.
Now let’s talk about HostGator.
Right after purchase, HostGator made starting with WordPress super easy. I was redirected to the Customer Portal Dashboard, where I followed these steps:
- I clicked on the “Websites” tab in the left-hand menu.


- On that page, I hit “Add Site”, which took me to the Hosting tab.
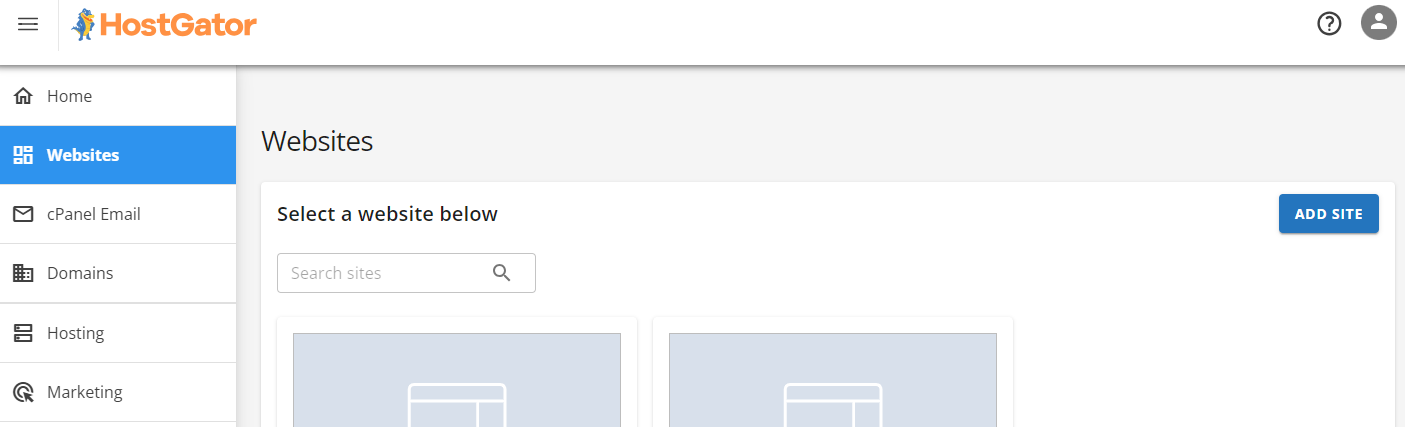

- I selected the package where I wanted to install WordPress, then clicked “Manage.”


- Once inside the hosting dashboard, I clicked “Add Site” again.
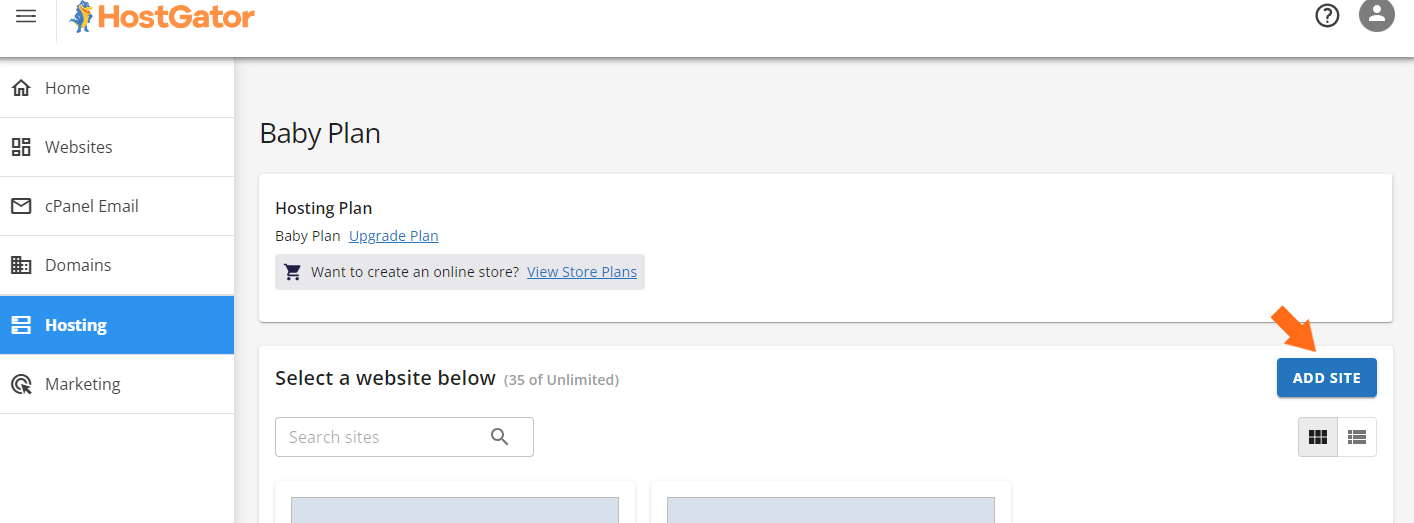
- On the next screen, I chose “Install WordPress” and clicked Continue.
HostGator asked me to name my site (or skip it), then showed three domain options:
- Enter a domain name
- Use a temporary domain
- Skip domain setup for now
I chose my domain, confirmed the details, and WordPress started installing. Within a minute, my new site was ready.
To view the WordPress dashboard, I had two options:
- Option 1: Go back to the Customer Portal, navigate to Websites, and click “Edit Site.” HostGator automatically logged me in using Single Sign-On (SSO), with no passwords or credentials needed.

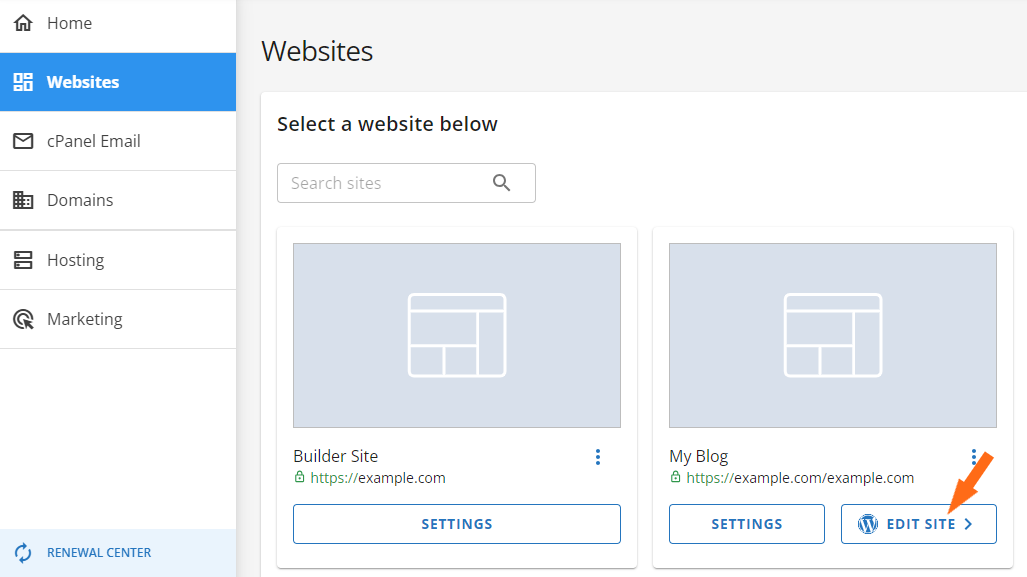
- Option 2: Wait for DNS to propagate and log in manually via yourdomain.com/wp-admin using the setup credentials.
I chose the Customer Portal route (Option 1). It was seamless and beginner-friendly. The one-click install with automatic login made setup fast and smooth, with no friction, no confusion.
Server Management
Lastly, I wanted to see how easy server management is, especially for users who are not super technical.
With Namecheap, it depends on the plan. I explored each one to get a feel for the control and ease they offer.
I started with shared hosting, everything runs through cPanel. It’s powerful, but can take some getting used to if you’re a complete beginner.
From cPanel, I could:
- Upload files through the File Manager or FTP
- Create and manage databases with MySQL and phpMyAdmin
- Install apps like WordPress using Softaculous
- Monitor website traffic and usage statistics
- Configure email accounts, spam filters, and forwarders
- Manage security settings, including SSL, IP blocking, and Hotlink protection
Overall, cPanel gives you full access to what you need, but it’s not the most beginner-friendly. There’s a learning curve if it’s your first time.
Next, I wanted to see what EasyWP offers in terms of control, especially since it’s a managed service.
Even though it’s designed for simplicity, I was surprised by how much I could still manage:
- File access through SFTP, so I could upload and edit my theme files directly
- Database access using phpMyAdmin, which let me tweak plugin data and settings
- A built-in Analytics tab showing CPU and RAM usage, which is super helpful for monitoring performance
- Toggles to enable Supersonic CDN, manage SSL, and turn on maintenance mode
- A clean, minimal dashboard that gives you just the right amount of control without overwhelming you

Honestly, EasyWP strikes a great balance. You don’t get full root access, but for managing a WordPress site, it gives you all the essentials, without the bloat of cPanel.
If you’re using a VPS or dedicated server, Namecheap gives you even more flexibility, but also more responsibility.
You can choose between three levels of server management:
- User-Responsible – You do everything yourself. Full root access, total control, no assistance from Namecheap. Ideal if you’re confident with Linux server administration.
- Basic Management – Namecheap helps with basic server setup and hardware issues, but you still handle most of the technical work.
- Complete Management – They take care of everything: monitoring, patches, troubleshooting, backups, and more.
You can choose between cPanel (for an extra cost) and Webuzo, a lightweight, beginner-friendly panel. I tried Webuzo briefly. It made setting up users, domains, email, and apps pretty simple. This one’s easier than using the command line, but still a bit advanced for most casual users.
On HostGator, everything felt centralized. After logging into the Customer Portal, I clicked on Manage under my hosting plan.
There, I could:
- See my IP address and server status
- Access cPanel in one click
- View RAM, disk, and bandwidth usage
- Add domains or subdomains
- Enable/disable services

For VPS and Dedicated plans, the Resources tab shows usage graphs and upgrade suggestions. Everything’s clearly labeled and easy to follow. The Customer Portal handles about 90% of what you need. cPanel is only needed for advanced tasks.
It’s the kind of experience you want as a beginner or busy user: no guesswork, just easy access.
6. Privacy and Security Comparison: Which Platform is More Secure?
HostGator offers more hands-on control and flexibility for advanced users.
Namecheap Privacy and Security
From the start, Namecheap made it clear that privacy and security matter, without charging extra for the basics.
I got free PositiveSSL certificates, automatically installed. These go beyond standard HTTPS, coming from Sectigo, a trusted certificate authority, to build visitor trust.
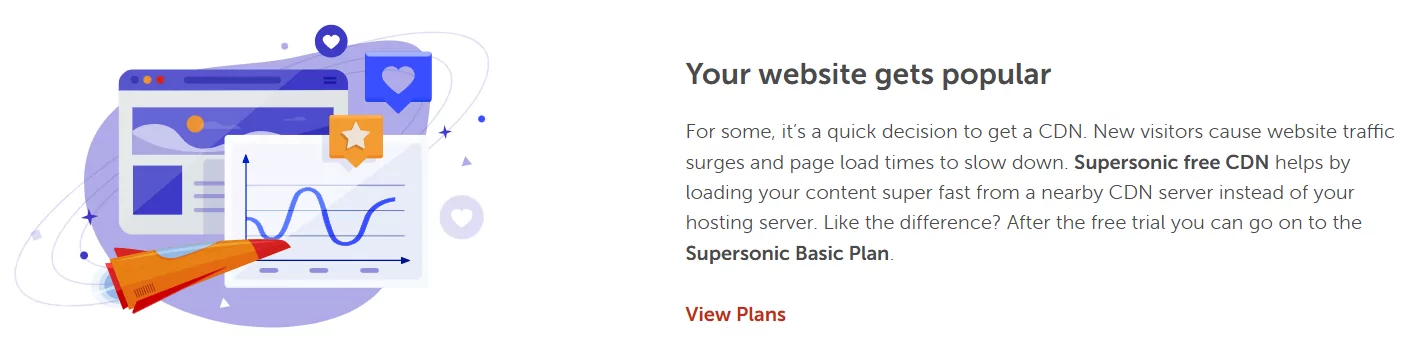
Behind the scenes, Namecheap adds ModSecurity WAF and DDoS protection through their Supersonic CDN, which spreads traffic and blocks bad actors. I didn’t have to set up a thing. It was all handled automatically.
Backups aren’t included with the entry-level Stellar plan, but after upgrading to Stellar Plus, daily backups started automatically.
You also get email spam and virus filtering, plus free WHOIS privacy to hide your personal info.
I also explored the EasyWP security dashboard, where you can turn on:
- HackGuardian (locks down your site in a read-only state)
- MalwareGuardian (scans every 2 hours and reports threats)
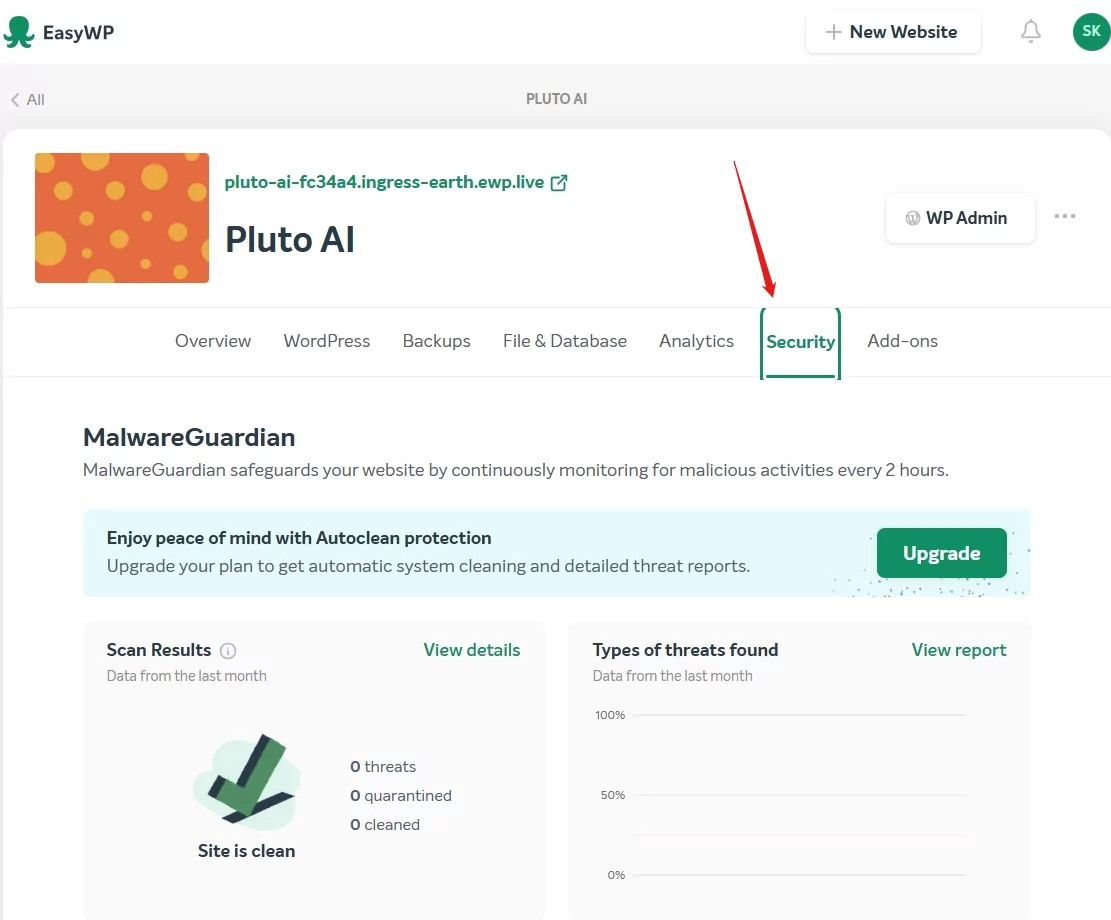
It’s more than just checkboxes. You can view logs, run scans, and adjust protection levels. For VPS or dedicated servers, Namecheap offers full root access, SSH, and optional Webuzo or cPanel, with flexible management tiers (DIY, basic, or complete).
At the account level, you get 2FA, login alerts, and detailed control over password recovery, which is rare for a budget host.
HostGator Privacy and Security
HostGator offers solid basic security, but most advanced protections are manual or cost extra.
Like Namecheap, they include free SSL, Cloudflare CDN, and basic DDoS protection. Their firewall and ModSecurity block common threats, but malware scans, backups, and extra privacy come only with paid add-ons like SiteLock, CodeGuard, and domain privacy.
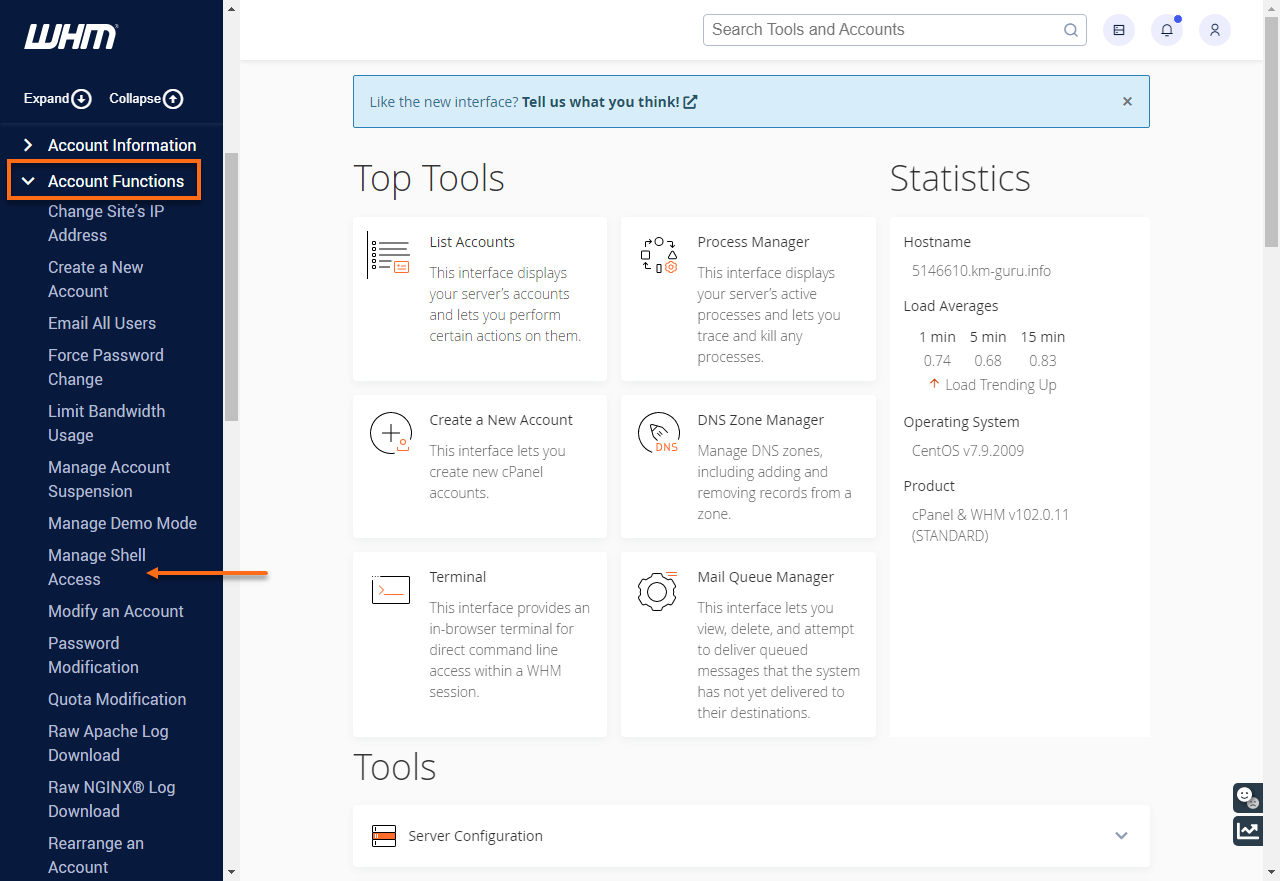
What HostGator does well is guide you on securing your account. They check weak passwords, offer SSH, directory privacy, and video tutorials. Still, you’re responsible for updating apps, managing permissions, and cleaning your site if needed.
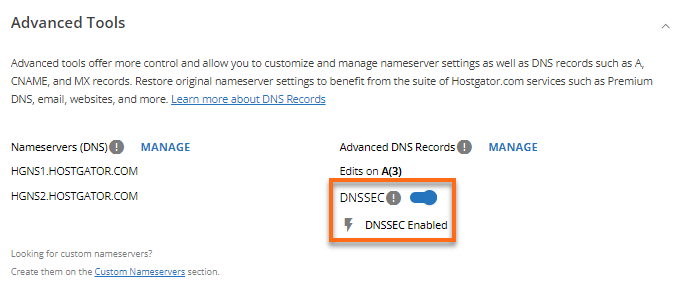
From the Customer Portal, I could toggle SSL and DNSSEC and manage SiteLock, but installing, setting up scans, and monitoring malware was all on me.
If you’re experienced, you’ll like the control. But if you want a set-it-and-forget-it setup, it takes more effort than Namecheap.
7. Server Locations Comparison
Namecheap has more server location flexibility across regions.
Server location matters because it directly affects how fast your site loads for visitors in different parts of the world.
Namecheap Server Locations
Namecheap lets you choose your server location, which I found really useful. Picking a nearby data center can reduce latency and speed up your site if you know where your audience is.
Here’s what I found:
- USA – Phoenix, Arizona (PhoenixNAP datacenter): main hub for shared, VPS, email, and dedicated hosting
- Europe – Amsterdam: shared hosting only
- United Kingdom – Farnborough (Datum data center): shared hosting only
- Asia – Singapore: shared hosting only, great for APAC sites
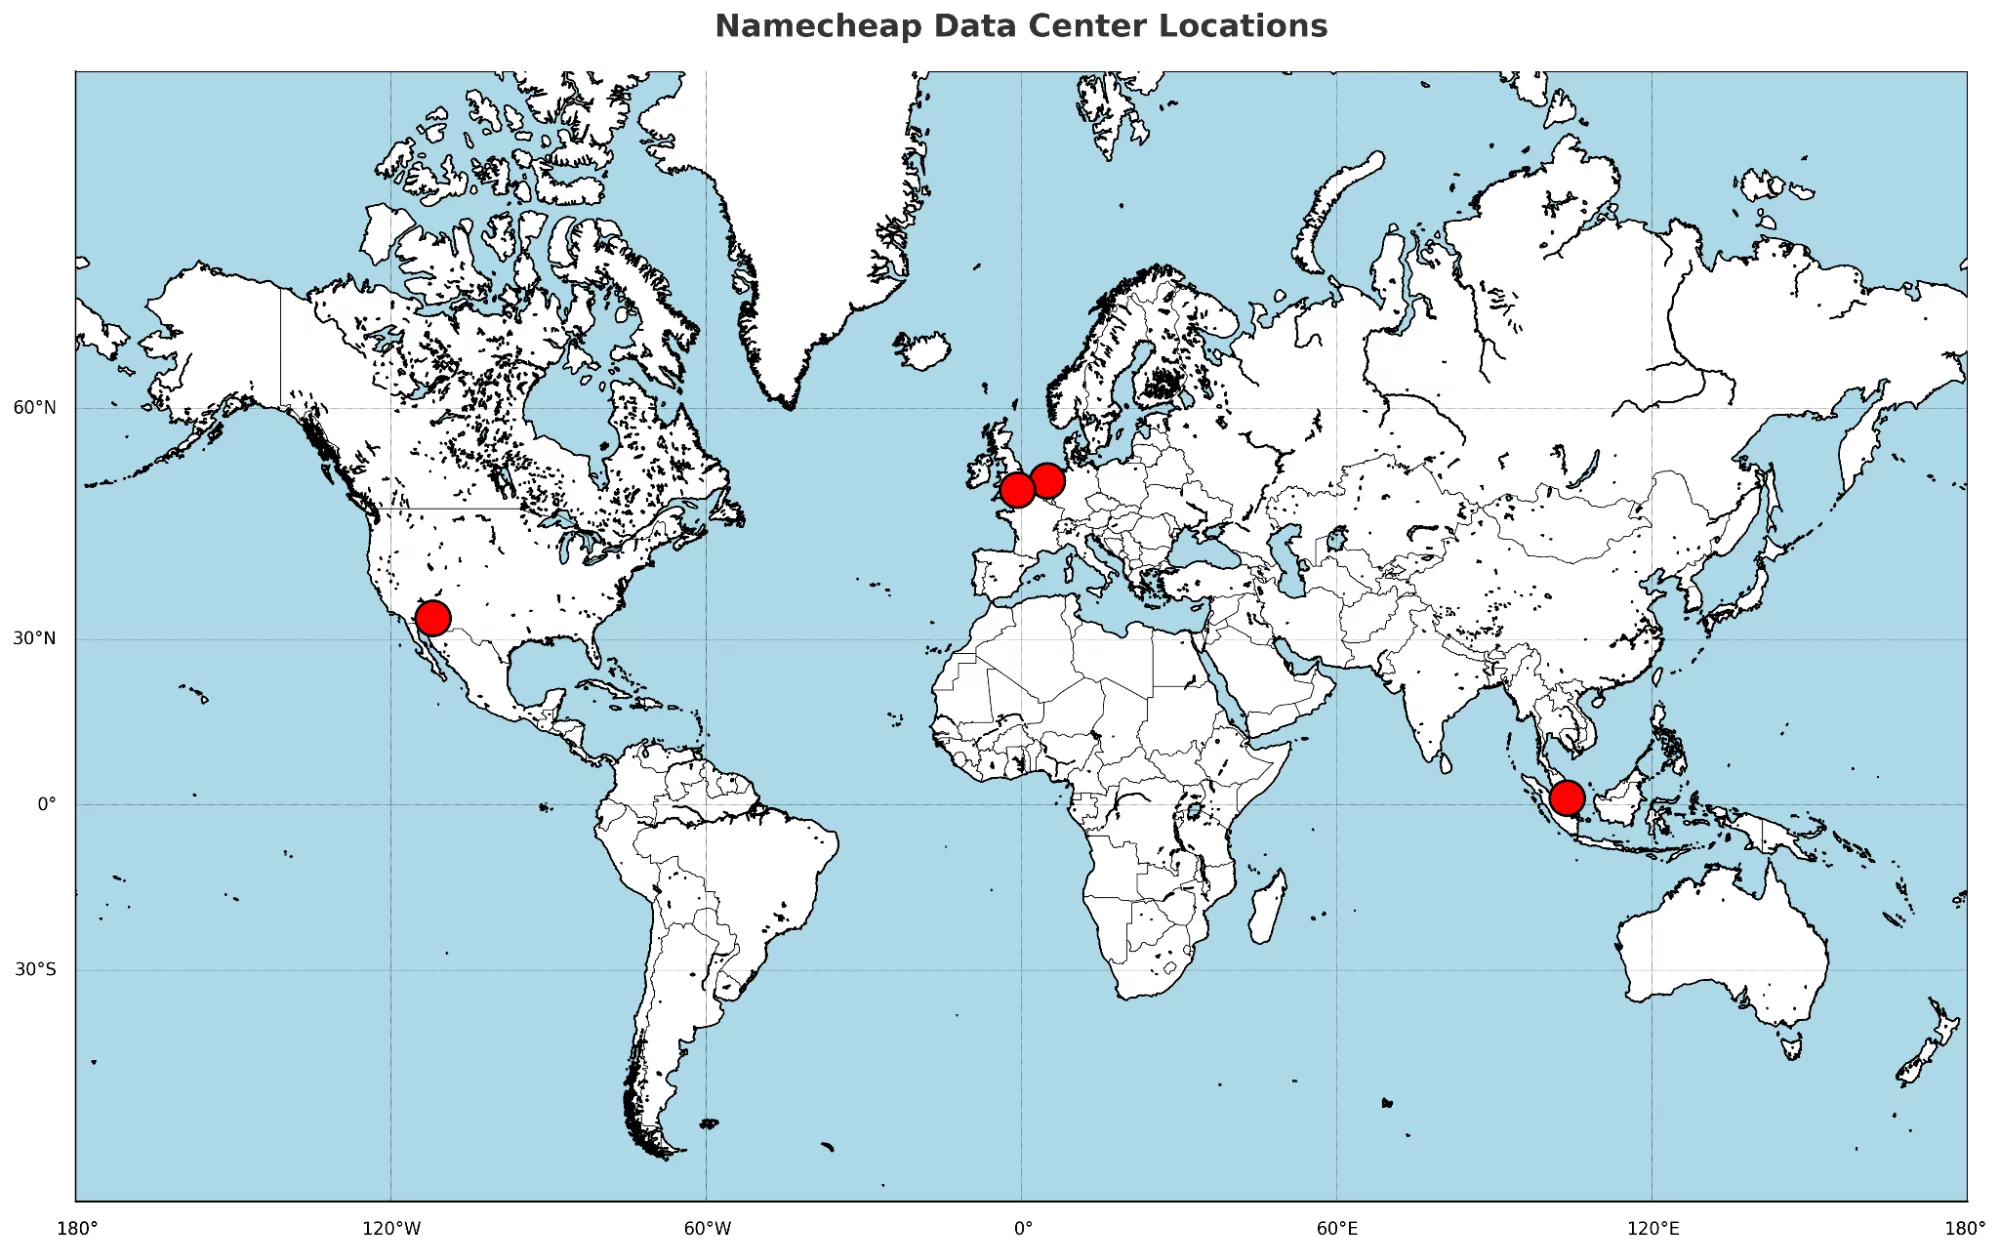
Plus, if I ever wanted to switch data centers after purchase, I just needed to contact Namecheap’s Billing team via live chat. That kind of flexibility isn’t common with budget hosts.
HostGator Server Locations
HostGator doesn’t let you choose your server location. Most servers are in Provo, Utah, and Atlanta, Georgia, with a few others in undisclosed U.S. spots.
They offer Cloudflare to cache content globally, but your site’s main server stays in the U.S., and you can’t pick or see its exact location.
There’s no option to select data centers or get direct access, and their setup isn’t very transparent. I couldn’t even find where my server was in the dashboard.
Namecheap vs HostGator: The Bottom Line
After testing both platforms step by step, HostGator takes the win. It may cost a bit more, but it makes up for it with smoother onboarding, easier site setup, and stronger customer support.
It also includes more essential features out of the box, which makes a big difference if you’re launching your first or second website.
| Category | Winner | Why |
|---|---|---|
| Pricing and Plans | Namecheap | Offers much lower entry prices and better discounts for beginners |
| Support | HostGator | Faster live chat, more responsive agents, and includes phone support |
| Hosting Features | HostGator | More built-in tools like backups, malware scanning, and higher limits |
| Website Performance | Namecheap | Delivered faster load times and smoother front-end interaction |
| Ease of Use | HostGator | Seamless dashboard, easier WordPress setup, better server management |
| Privacy and Security | HostGator | Offers more control and options, especially for advanced users |
| Server Locations | Namecheap | Lets you choose from multiple regions and even change later |

