
A WordPress staging site is a private copy of the main website. It provides an environment where website admins can test changes or upgrades before implementing them on the live site.
Limitations such as the ability to fully preview pages, posts or themes usually force website owners to apply changes and then see if they will work. The trial and error approach is risky, especially for busy websites. Also, bad code or plugins may damage the website and inconvenience the users.
To overcome this, a staging site provides a test environment which is private and does not interfere with the live website, hence does not affect the users.
Main methods for setting up WordPress staging sites
Generally, there are several options that you can use to create a WordPress staging site. These differ in complexity, required skills, cost and time it takes to implement.
Most of the free methods require higher expertise levels while premium services are simpler and quicker.
Let us now explore the commonly used methods, their level of complexity, advantages, and limitations. In this article, we will show you how to create a staging site using the following three main methods.
<li”>Manual configuration using the control panel of the website
Option 1: Hosted staging environment
A staging feature in the hosting account provides an easy and fast method. This is usually a service by the website hosting company or third-party that hosts staging sites.
How to set up a staging site through a website host
The hosting providers who include easy-to-use one-click staging site features include Kinsta, WP Engine, Flywheel, and others. However, there are other third-party providers such as WP Stagecoach who offer staging services to website owners whose hosts do not have the feature.
Creating a WP staging site on Kinsta
Although the exact procedure may differ slightly, the process is almost similar across hosting providers. For the purpose of this article, we will look at how to create a staging site on Kinsta.
- Login to your Kinsta account,
- Click Sites and select the one you want to create the staging environment for.
- Select staging from the dropdown list at the top of the right-hand pane.
- Click Create A Staging Environment.

This tool creates the staging environment on Kinsta’s website. This will have URL such as https://staging-yourwebsitename.kinsta.com.
It takes about 15 minutes to create the staging environment. This has its own control panel that allows you to perform tasks similar to those for the live site and try out try out all changes before applying them on the main website.
Once satisfied with any modifications, you can use Push To Live button to update your website.

Use a third-party hosted staging environment
If your host doesn’t provide the staging feature or environment, you can use a third-party provider such as WP Stagecoach. This is usually a premium service where you pay the provider to host your staging site.
The provider creates and hosts the staging site on a different server from the live website.
How to create a staging site using WP Stagecoach
The WP stagecoach hosted staging service requires a plugin which is only available to customers who have purchased the package.
To get the plugin, register at the WP stagecoach website where you must select the desired package and your payment details. You will then receive the WordPress plugin and licence key.
- Install and activate the plugin in your WordPress dashboard
- Open the WP Stagecoach plugin
- Use your account details and a license key provided after registration
- Type in the custom URL for your staging site
- Disable caching plugins, and password protect the staging site
- Click Ride the Stagecoach to create the site. Once complete, it will provide you with the URL for the staging site.

You can now access the staging site using the same username and password for your live website.
The staging site using this method is usually hosted on a separate server. While this reduces the load and resources requirements on your server, it might lead to issues, especially if the two servers and environments have many differences.
Option 2: Create a staging site using a WordPress plugin
There are several staging site plugins available. For the purpose of this article, we will see how to create the staging site using the WP Staging plugin which has a file and database duplicator, as well as migration ability, including automatically changing the URLs. The procedure is as follows.
- Install and activate the WP Staging plugin
- Open the plugin in the WP dashboard and click on Create a Staging Site. Enter the name for your staging site.

You can select the DB tables as well as WP folders to copy to the staging site otherwise just use the defaults. - Click Start Cloning to create the site.

Once complete, it gives you a message and a link to the staging site. Use this to open the staging site with the credentials for the main site.
Option 3: Creating a WP staging site manually a website control panel
The manual method is more challenging and requires some expertise in Cpanel and databases. However, it provides better control and does not have limitations like the other tools or plugins.
The steps in this method are
- Creating a subdomain in the cPanel
- Copying files to the staging site (subdomain)
- Copying or importing the database to the staging site
- Modifying the database to replace domain URLs with staging site URLs.
- Modify wp-config.php file in the staging site
Create subdomain
Login to the cPanel, click on Subdomains and create a new one for the staging site. For example http://staging.example.com

Copying files
You can use the legacy file manager in cPanel to copy files and phpMyAdmin to export the database from the live and import it to the staging site. Alternatively, you can use FTP in cPanel, a duplicator or migration plugin to create a backup of the site and then copy it into the staging subdomain.
Using the file manager, select the directory or files you want to copy to the staging site. For example, if your WordPress installation is in a directory called WP,
- Highlight the directory in the cPanel file manager and right click.
- Select copy, It will give you the option to enter the path where to copy the files to.
- Type the path for the staging site – i.e. /staging.example.com and proceed. This process will copy all the files, plugins, images, and themes to the staging site.

Create database file for the staging site
- Using MySQLdatabases tool in the cPanel, create a database file for the staging site.
- After successful creation, create and assign a user to the new database.
- Give the user all privileges
Export and import database
- Go to phpMyAdmin and select the database for the main site
- On the left pane, click Export. This will download the database to your computer.
The old database has URLs that point to the live website and you need to change these to the staging site URLs.
Use a code editor to replace the URLs on the database file downloaded on your computer – i.e. from http://example.com to http://staging.example.com.
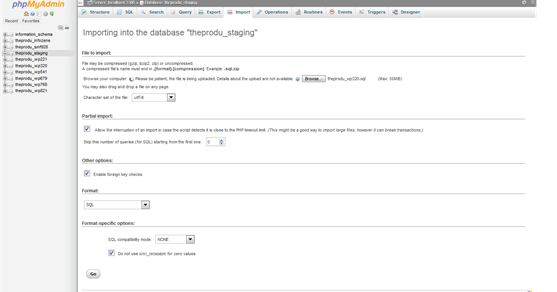
Import database file into the staging site
- Go to phpMyAdmin and select the new database that you created for the staging site.
- Click Import on the right-hand side pane.
- Select the database file you saved on your computer and click Go to proceed. Wait for the process to complete.
Modify the wp-config.php file in the staging site
- Go to the staging site directory using the cpanel file manager and locate the file wp-config-php.
- Open the file with an editor and look for the database file. This will have the name for the database file in the live site. Replace this with the one you have created for the staging site, replace the password as well.
After this process, you can now access the staging site and log in to the dashboard using the credentials for the live site. Ensure the site is not indexed by search engines and also disable SEO plugins that may cause duplication issues.

Once the staging site is created, you can now do all the changes and test them. If satisfied, you have several options to update your live site. You can either push the changes from the staging sites or manually make similar changes in the live site.
Most premium staging plugins and tools have an easy-to-use push feature that allows you to select a few changes or the entire site. If the automatic feature is unavailable, use the manual process or a migration or duplication plugin. However, it is recommended to always backup the live site before updating.
Conclusion
A WP staging site provides a convenient and safe environment to test plugins, themes, and other changes before applying them to the live website. Although, there are several options for developers, the most commonly used methods are three.
These include; using a staging site feature provided by the website host or third-party hosting environment, using a WordPress staging plugin, or performing the process manually on the account’s control panel.
Each of the methods for creating a WP staging site has its level of complication, requirements, ease of deployment as well as limitations. Hosted staging environments are the easiest to implement, followed by WordPress plugins. The control panel method requires more skills but offers the best control.
Check out the top 3 WordPress hosting services:
- Do you need the best wordpress hosting? Check out for our recommendations by clicking here.


